- Introduction
- Key Asset Facts - Create An Asset Note
- Maintain Mobile App Performance - Do Some Job Housekeeping
- A Complex Survey Template Made Easy - Some Pointers
- Create A New Survey Template By Merging Two Or More Existing Survey Templates
- Survey Templates & Job Flexibility
- Using Optional, Recommended & Required Questions
- Consistent & Efficient Jobs - Create Great Surveyor Guidance Notes & Photos
- Need Some Property Icons - Here Are Some Recommendations
- Take Photos, Lots Of Photos!
Click on the topic you want to learn more about, alternatively scroll down the page.
Introduction #
Sometimes hints and tips are quick one-liners, and sometimes they are a bit more involved.
Where they are a bit more involved, we provide some click/tap step-by-step guidance and screenshots.
Key Asset Facts – Create An Asset Note #
Is the Property tucked away and hard to find? A big angry dog next door? Where to park nearby? In the Dashboard, from the edit asset sidebar use the ‘Asset Notes – Viewed on Surveyor App’ text box to enter helpful instructions. Next time you visit the property you can be prepared!
Maintain Mobile App Performance – Do Some Job Housekeeping #
Any App Device will be quicker (and easier to use) if you remove submitted jobs from the device. You can do this from the Jobs Screen.
A Complex Survey Template Made Easy – Some Pointers #
Setting The Scene
If you already have a simple paper checklist that you want to recreate, then all you need is probably one section, with one item and all your questions under that. Problem solved. However, sometimes the survey template challenge is much more complex.
Some Important Considerations
- Are there legal requirements for the final report? Better understand these before you begin.
- Do your responses need to protect you from legal ramifications? Better establish standard wording to frame a question and its response.
- Imagine performing the job, what tasks need to be done first and what needs to be done last. You don’t need always to do things in order but sometimes it helps.
- Are App users experienced or inexperienced? Consider creating great surveyor guidance notes & photos (we’ve written about that below)
Manageable Layers Of Detail
- Separate the survey into manageable layers of detail that are simple to follow yet contain all the information your users need to carry them out successfully.
- Long threads of activity can be broken up into Sections (the top layer) and items (The mid layer) that are simple for everyone in your business to locate and use. There is no right or wrong, but when we create survey templates we generally aim for not too many and not too few of each.
Question Notes
- When in doubt build surveys with question notes enabled. No matter what the question type you will always be able to add text and photos to the response.
User Experience – Section & Item Icons
- The first time somebody interacts with a survey, they will not recognise section icons and item icons – they will read the names. However, over time this will change. Icons provide visual interest and a visual shorthand for the user experience.
The Building Block Approach
- Some Section, item and question combinations are unique. Many are not. When we build a survey template, we often build an empty generic section, with an empty generic item. Then we populate that item with questions. Questions can often be duplicated / edited to accelerate progress. Then we duplicate/ edit that item. Then we duplicate/edit that populated section. Effectively we create a box of repeatable building blocks, capable of very quick configuration and reuse.
- You can duplicate items from other sections, or even from other survey templates to accelerate the survey template build (we’ve written about that below).
Create A New Survey Template By Merging Two Or More Existing Survey Templates #
So your boss has asked you to create a new survey based on two or more existing survey templates? You know that you can duplicate a copy of an existing survey, but surely that means you have to manually retype the parts you need from the other surveys? That could take ages!
Yes, if that were the case it would be soul-destroying. However, we allow you to copy any item from your existing survey templates into the one you are creating or editing. Result!
Step 1
Make sure you know the name of the item that you need
Step 2
- From the Section ‘Items List’ page you want to copy the existing item to…
- Type the first few letters of the item name into the ‘Add a new item here by typing its name’

- As a result a drop down list of matching items appears. They are presented in ‘item name – section name’ format.
- Remember that there can be more items than are immediately visible in the drop down list.
- So either scroll down the drop down list until you find the one you want, or type in a few more letters of the item name to narrow down the options.
Step 3
- Tap the item name – section name that you want.

- As a result a copy of that item is added to the section
- The item name has ‘copy of’ appended in front of the item name.
- You can remove ‘copy of’ by editing the item name.
Survey Templates & Job Flexibility #
Using Sections #
Are you going to be faced with identical checks over the exact same thing during a job? A good example of this would be fire doors in a building, or multiple bedrooms. You have several choices.
Option 1: Create a survey template with the exact number of sections that you need. This will be easier if all your questions about that object/topic appear in items under a single section.
Option 2: Create a survey template with more sections than you might need, and at report stage exclude unused sections.
Option 3: Create a survey template with one section in the survey template, but set it so that it can be duplicated (and renamed) during a job. You do not need to be online to duplicate sections, just make sure that you enabled this feature in the survey template
Using Items #
For very simple checklists one section and one item can be a great approach.
For more complex tasks /or spaces consider using several items under one section, this will enable you to group questions and provide natural breaks.
The App has the ability to duplicate another instance of an item and its questions.
The duplicated item will not include any surveyor responses. It can be renamed and placed under any section. You can even remove questions if you want to.
You do not need to be online to duplicate items, just make sure that you enabled this feature in the survey template.
Example:
If you built a bathroom section with a plumbing item, and you found an unexpected toilet in a garage, you could copy the plumbing item from the bathroom section and put it under the garage section.
Using Optional, Recommended & Required Questions #
How do you communicate the importance of responding to a question? When you create a survey you can flag a question as optional, recommended and required. Where Survey/checklist questions are deemed mandatory for various reasons, use the ‘Required’ flag. However, if there is no real driver to do so then think about using the optional or recommended question flags – so that the user is encouraged to use their discretion.
Any unanswered required question will be very visible, because any item that has one or more of these will have a number against a red ball. So you can simply scroll down the items looking for the red balls with a number. Alternatively where all the required questions have been answered the item will have a green tick against it. If you set up a conditional question (one that is dependent on another questions response to appear) with a required flag, and the conditional question is not triggered to appear – it will be impossible to respond to that question and reduce the red ball counter and/or get the item tick to appear. So the best approach is to set any conditional question to optional if you want the ability to reduce the item red ball counter down to zero (and raise the item tick).
Having outstanding recommended and required questions do not block the sending / submission of a job back to the Dashboard.
Consistent & Efficient Jobs – Create Great Surveyor Guidance Notes & Photos #
Background
To help improve consistency and efficiency, underpin jobs with great guidance notes and supporting photos. Experienced survey respondents can happily ignore these unobtrusive pointers, but the less experienced will thank you for thinking of them!
Question Guidance
- Be clear and specific in the wording and needs of the question [Question-wording will appear in the final report]
- Use the question description text to provide instructions on how to respond, to the question type. [This wording will not appear in the final report]
- Where you ask for a single or multiple-choice response provide clear and specific options [Selected option(s) will appear in the final report, so make sure they resonant with the question-wording!]
- Optionally you can provide supporting photographs to show situations to match against or even to show the desired outcome of an action. A real life example of this might be how you want a shop display to appear or how you want a rental property to be arranged once it has been cleaned [Question-supporting photos will not appear in the final report].
- To take a closer look at the photo in the app, tap on the photo thumbnail
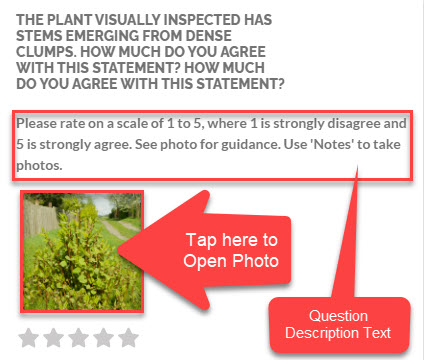
- As a result a larger version of the photos will open.
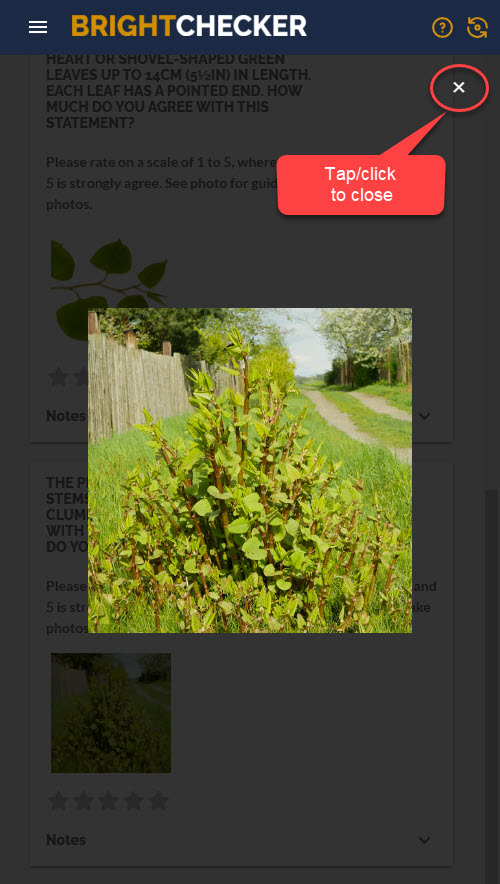
- Tap/click x to close the photo and return to the question.
Item Guidance
- Would an item benefit from some overall guidance ? Use a short sentence or two to describe this. You can add this when you are creating / editing an item in the dashboard. When the item is listed underneath a section, the text will be visible. When you enter the item the text will The text will appear at the top of the item, above any questions [Item descriptions do not appear in the final report]
- Optionally you can provide supporting photographs to show what an item looks like. Add / delete photos when creating/editing an item in the dashboard.
- To take a closer look in the app, tap on the photo thumbnail to open the full photo. [Item supporting photos will not appear in the final report]
Need Some Property Icons – Here Are Some Recommendations #
Here are some useful icons that might help.
There are three blocks of icon suggestions in the diagram below.
Column 1: Has a room/topic and column 2 has the icon name and what it will look like in the app.
Columns 3 & 4, and Columns 5 & 6 follow the same pattern.
![]()
Note:
These are just a few of the available icons, the full range of icons is shown elsewhere in the Knowledge Base.
Take Photos, Lots Of Photos! #
Take close up photos, take photos a bit further back to set context.
The reports produced by the system look great with lots of photos. 16:9 ratio photos are compressed and stored with circa 1.5 million pixels. Th exact number depends on the photo composition.
We could have increased the resolution, buts it was a trade off against speed when it comes time to upload them on 4g internet.