
Inspect
What is BrightChecker Inspect?
BrightChecker Inspect is inspection software for planning, carrying out and reviewing structured property inspections and surveys.
Prepare inspections from reusable templates, carry them out in the field, capture responses and evidence, work without an internet connection, then submit and review the completed inspection ready for reporting.
Less admin. More inspecting.
Spend less time preparing inspections, finding information and dealing with paperwork — and more time doing the work that matters.
Get more done in the field.
Give inspectors everything they need to complete the inspection on their device, without having to stop, switch systems or wait for information.
Keep inspecting wherever the job takes you.
Work fully offline when there’s no signal, then synchronise the inspection when connectivity returns.
Keep complete, usable evidence.
Responses, photographs and other evidence stay connected to the inspection, giving you a complete record from fieldwork through review.
Know what’s happening across your inspections.
Track surveys through each stage, see what’s complete and identify what still needs attention — without chasing people for updates.
Check the inspection before it becomes a report.
Review the completed inspection, check the evidence and make any necessary changes before approving it for reporting.
How BrightChecker Inspect works
1. Prepare — Create or select a property, then choose the inspection template.
2. Assign — Create the survey and assign it to the person carrying out the inspection.
3. Inspect — Download the survey and complete it in the field, including offline.
4. Submit — Complete the inspection and submit the captured information and evidence.
5. Review — Check responses, evidence and amendments before approval.
6. Report — Use the approved inspection data to produce the final report.
Next, we take a closer look at each stage of the inspection journey, starting with the property.
Create and Manage Property Records
Every property inspection is associated with a location. Select Property from the main menu and you’ll arrive at the property table, where your properties are listed and can be sorted and filtered.
Every BrightChecker organisation starts with a default property — 10 Downing Street — so there’s something ready to explore from the moment you start. Open it to get a feel for how a property works, or use the Create Property quick action to add your own.
Creating a property starts with a few essential details, such as its address. Once those details are complete, the property is created and automatically saved as you work. From that point, the property becomes its own Property Command Centre — ready to build up as you use BrightChecker.
You can keep it simple or add as much information as you need. Add a hero image and other photographs, view the location on an interactive map, record details such as building type, construction, EPC and bedrooms, or add practical information such as access arrangements, parking and other notes. You can also keep confidential information within the record, with access controlled according to user permissions.
The Command Centre is already structured to bring the property’s activity together. You can quickly create a survey job from the property, with the relevant property information already available. As you use BrightChecker, the same Command Centre can show the surveys carried out at the property, reports produced, issues identified and work orders raised.
Use, Adapt or Create Inspection Templates
Start with a ready-made inspection checklist from the BrightChecker library. Use it as it is, adapt it to suit your requirements, or create your own survey template from scratch.
A survey template is the checklist you use to carry out a survey or inspection. It defines what you want to check and the information you want to capture.
Use a BrightChecker checklist
BrightChecker provides a library of ready-made inspection checklists that you can use straight away.
When you activate a BrightChecker checklist, BrightChecker creates a unique copy for your organisation. You can use it unchanged, or modify it to suit the way you work.
The template table makes the source of each template clear, while Template Groups help you organise and navigate larger collections of checklists.
See how to activate a BrightChecker template → [short video]
Adapt it to your requirements
You don’t have to use a BrightChecker checklist exactly as provided. Once activated, your organisation has its own copy that you can change to match your inspection process.
You can change questions and response options, adjust ranges and ratings, and add or remove sections and elements.
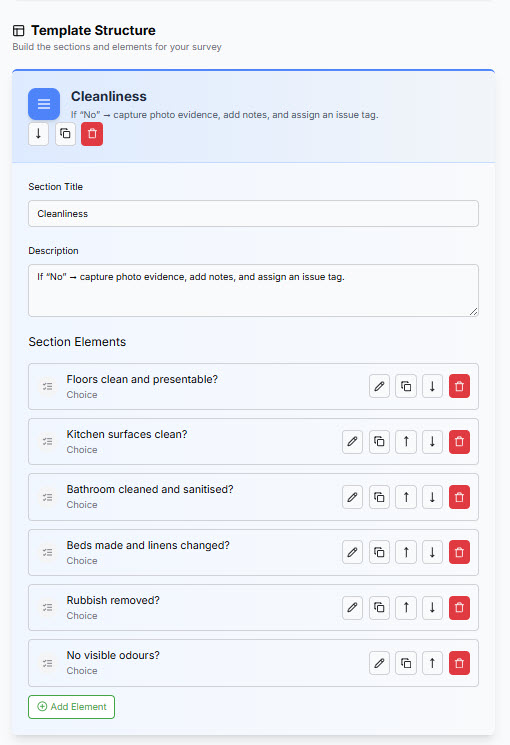
Brightchecker – Template builder screen shot. Whilst Brightchecker does provide prebuilt survey templates, you can also build your own with the survey template builder
Survey Template Builder
Elements are the questions and prompts that make up the inspection — from text and multiple choice through to dates, locations, measurements, steppers, scales, star ratings, signatures and media prompts.
You can set questions as optional or required, giving you control over what must be captured when the template is used. We’ll come back to required questions when we look at the survey response form in use.
You can also define categories that sit alongside responses. BrightChecker provides standard categories such as Priority 1, Priority 2, Priority 3 and Information, but you can define your own where your work requires something different — for example, using RICS-specific responses rather than BrightChecker’s standard priorities.
See what the surveyors will see when they use the template
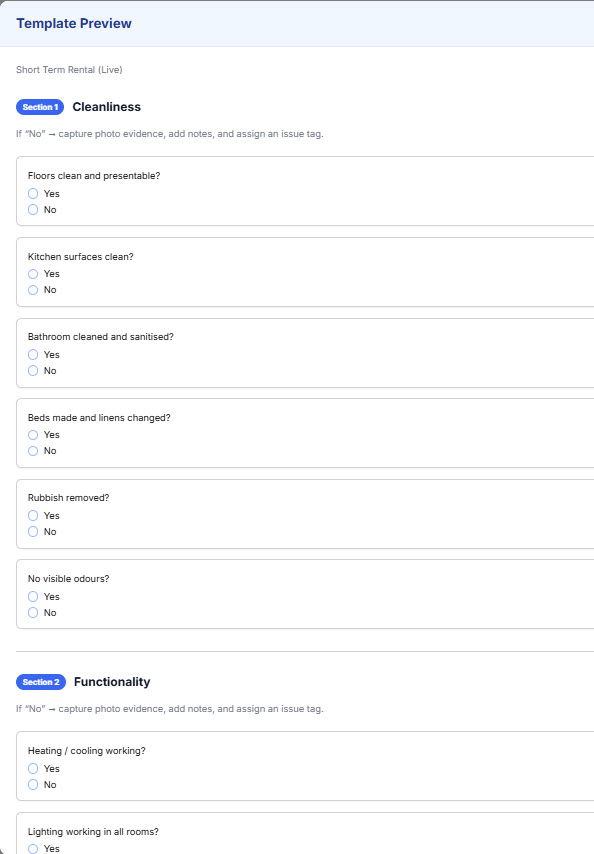
Templates can be previewed, downloaded or modified directly in BrightChecker.
Create your own survey template
If a BrightChecker checklist doesn’t give you the structure you need, you can create your own survey template from scratch using the template builder.
You choose the sections, questions, response options and other elements that make up the inspection.
Create structured survey templates with AI.
Describe what you want to inspect and BrightChecker can create a structured survey template for you.
The AI helps you build the survey template.
Refine the questions, responses and structure before you use it.
You decide what the finished survey contains.
That matters when consistency is important. The aim isn’t to replace a defined inspection process with a free-form AI guess. It is to help you create the structure you want to use.
See how AI can help create a survey template
Create and Assign Surveys
Create, assign and manage inspections from a central workflow.
In BrightChecker, a survey is the job used to carry out an inspection and capture the defined information and evidence. It brings together the property, the inspection template and the person carrying out the work.
You can create a survey from the main dashboard, the Survey Tracker or directly from a property. Creating one from the Property Command Centre automatically brings the property information into the new survey.
If you are working in the field, you can also create a survey directly on the device. Where necessary, you can create the property at the same time.
For this part, we’ll look at creating a survey from the main BrightChecker platform.
Creating a Survey
Creating a survey starts with three things: the property, the survey template and the person carrying out the survey.
Select the property, choose the survey template and assign the person who will carry out the work. Once those three essentials are in place, select Assign and the survey is ready to go.
You can add further information if you need to, such as the date and time, priority or instructions for the person carrying out the survey. If you simply provide the three essentials, BrightChecker will set the survey for 9:00 am the following day and give it a medium priority.
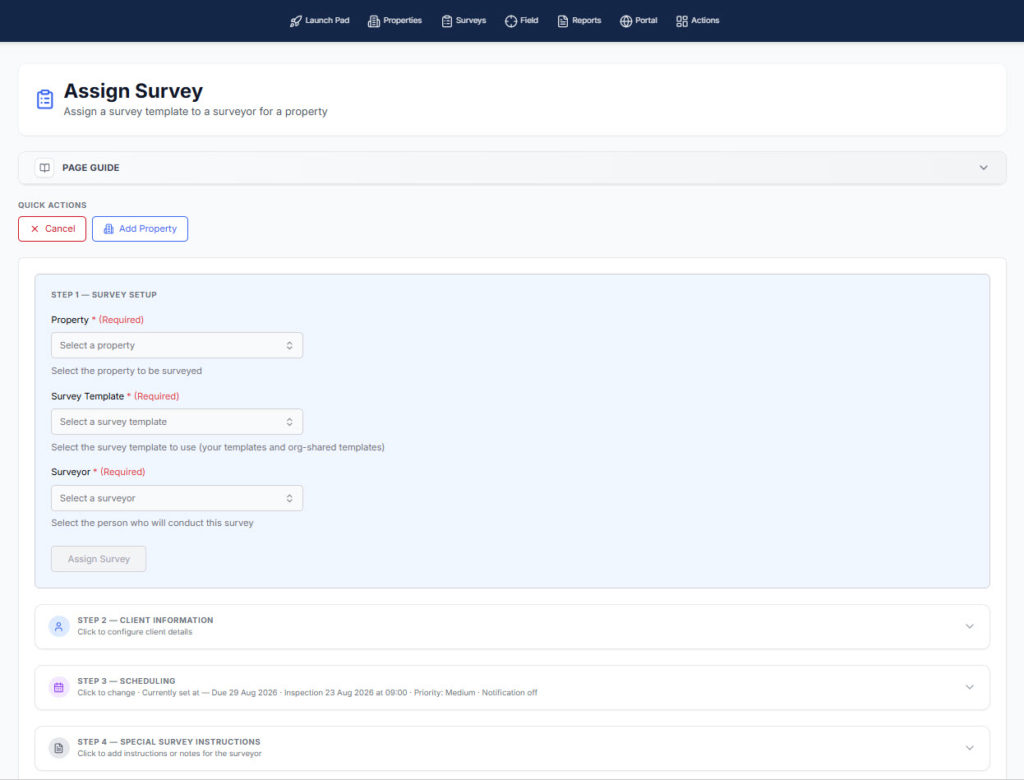
Once the survey has been assigned, BrightChecker takes you to the Survey Tracker.
Track Inspections from Creation to Completion
The Survey Tracker shows the lifecycle of each survey from assignment through to completion. It gives you a visual view of where the survey has got to, what has already happened and, most importantly, what needs to happen next.
Each stage is represented by a simple status indicator. Amber highlights the next action, green shows what has been completed, and grey indicates something that is either no longer applicable or lies further ahead in the process.

The tracker is more than a status display. Select the indicator for the current step and BrightChecker will take you to the next logical action. Where there is more than one possible action, it presents the available choices.
The result is a visual workflow that helps you understand the state of a survey without having to work it out from a list of records or screens.
The Survey Tracker also provides a complete view across your surveys. The table can be filtered and sorted so you can focus on the surveys, people, properties or stages that matter to you.
From here, the tracker tells you when it is time to move to the device being used to carry out the survey. That’s where the field part of BrightChecker takes over.
Field Dashboard
Give inspectors a clear view of the work assigned to them and the inspections they need to complete.
On a mobile device, BrightChecker automatically opens the Field Dashboard. On a computer, select Field from the main menu.
When accessed from a mobile device, BrightChecker also detects the device and automatically displays setup guidance for adding a shortcut to the device’s home screen. The guidance covers both Android and iOS.
The Field Dashboard shows the surveys assigned to that user. It also advises you if a survey is in progress on another device.
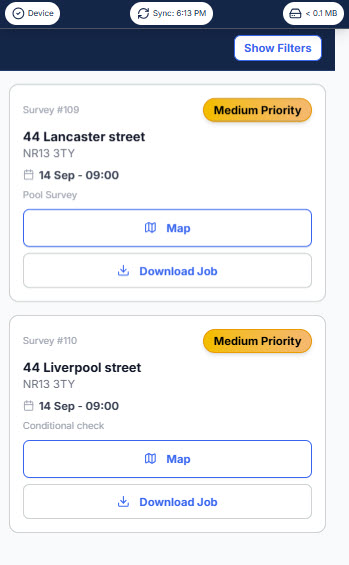
The Field Dashboard lists your survey jobs in date order, with filters available to help you find what you need. You can filter by things such as priority or whether a survey is overdue.
Each survey shows the key information you need at a glance, including the property address, survey template, date and time.
You can also open a survey to see further details, including its location on a map and additional information about the job.
At this point, the survey is available on the device, but the full survey has not yet been downloaded. It can therefore still be reallocated to someone else.
When you select the survey, BrightChecker asks whether you want to download it in full. Confirming the download brings the complete survey, including its sections and questions, onto the device.
This is also the point at which the survey becomes associated with the device and locked to the person carrying it out. If it needs to be given to someone else after this point, the existing survey must be deleted and a new one created and assigned to the other person.
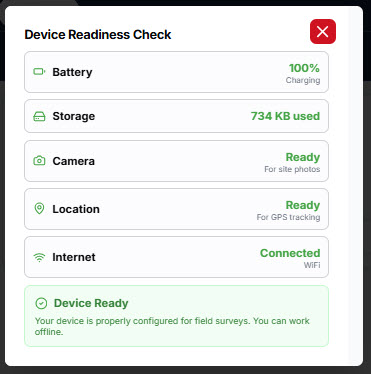
Device readiness at a glance
The Field Dashboard header changes colour according to the status of the device’s Readiness Check:
- Blue — no issues identified.
- Orange — an advisory needs attention.
- Red — immediate attention is recommended.
Click the device status pill in the header to open the full Device Readiness Check and see what needs attention before you start work.
Start an Inspection in the Field
Capture structured responses and evidence in the field, even when connectivity is unreliable.
Once the survey has been downloaded, BrightChecker confirms that everything is ready and gives you the option to Start Survey.
If you are at a property you have inspected before and are using the same survey template, you can choose to prepopulate the survey with your previous responses, or load the previous responses for reference only.
This is particularly useful for regular maintenance inspections, where you can quickly compare the current condition with previous inspections without having to start from scratch.
The Survey Response Screen
This is where you carry out the property inspection, working through the questions and capturing the information and evidence required by the survey template.
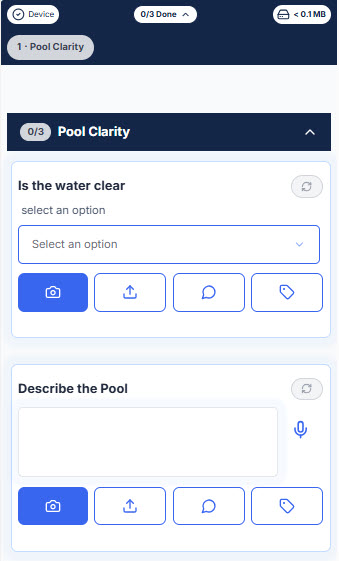
The response screen is organised into sections, which can be opened and closed as you work. Within those sections are the elements or questions defined by the template. Depending on the template, these can include text responses, selections, measurements, ratings, signatures, photographs and other media.
Quick navigation helps you see what you have completed and what still needs attention, while information such as the device battery level and GPS status is available as you work.
You can return to the Field Dashboard at any time and come back to the survey later. Your work is retained, so you don’t lose your progress.
Most importantly, the field system is designed to keep working when you don’t have an internet connection. Responses, photographs and other evidence can be captured offline and synchronised when connectivity is available again.
Submit Completed Inspections with Confidence
When you have finished, select Submit.
Before submitting, BrightChecker checks the survey for any questions that were marked as required in the template. If any required questions have not been completed, BrightChecker tells you which ones need attention and provides a direct way to return to them.
You can then complete the missing information and submit the survey, or, if you are certain that a required question does not need an answer in this particular case, you can choose to submit anyway.
Once submitted, the survey moves on to the next stage of the BrightChecker workflow.
Review Inspection Data Before Reporting
Check submitted responses, manage amendments and control the evidence that moves into the report.
Return to the Survey Tracker and the next step will be highlighted in amber: Review.
Select Review to open the survey review screen. Here you can check the information captured during the survey before it moves on to reporting.
The review screen gives you two views. One shows the original survey responses exactly as they were submitted. The other shows what will be included in the final report.
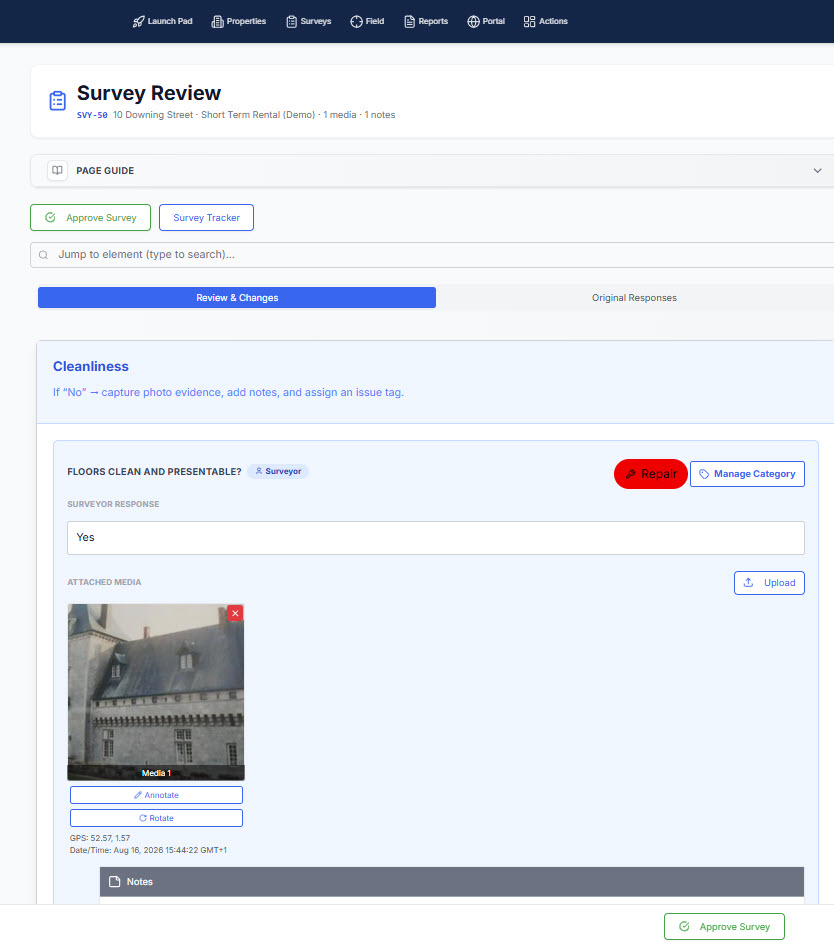
You can amend responses during the review, and BrightChecker records who made the amendment, providing an audit trail when the person reviewing the survey is different from the person who carried it out.
You can also control the media that will appear in the report. Photographs can be suppressed if they are not required, moved to a different element if they were captured in the wrong place, or used in more than one place where the same photograph is relevant.
For larger surveys, navigation by section makes it easy to move around the review, and you can search for specific elements rather than working through the entire survey.
You can also optionally use AI analysis during review. BrightChecker can analyse the reviewed inspection and provide an AI-generated summary of key findings, recommendations and the overall inspection.
When everything has been checked and any necessary changes have been made, select Approve to complete the review.
Once an inspection has been approved, the collected responses, findings and evidence can be used to produce the inspection report. BrightChecker Report takes the information captured during the inspection and turns it into a structured report for review and sharing.
An inspection can identify issues that need action after the fieldwork is complete. BrightChecker Resolve connects inspection findings with issues, work orders and follow-up actions so that identified problems can be managed through to closure.